Posted on

Tapping into Your Hero’s Emotions: The Key to Engaging Creative Writing

In the realm of creative writing, heroes are more than just characters who drive the plot forward; they are the heart and soul of your story. Understanding and tapping into your hero’s emotions is crucial for creating compelling narratives that resonate deeply with readers. 

Emotions not only humanize your hero but also provide the reader with a window into their inner world, making the journey more immersive and impactful. Here’s a detailed guide on how to effectively harness your hero’s emotions in your writing.

The Importance of Emotional Depth

Emotional depth in a hero is what transforms a flat character into a dynamic one. Emotions provide motivation, shape decisions, and drive actions. They also make your hero relatable, allowing readers to connect with them on a personal level. This connection is essential for maintaining reader interest and investment in the story.

  1. Relatability: A hero with authentic emotions mirrors the human experience, making them more relatable. Readers are more likely to empathize with a character who feels joy, sorrow, fear, and love in realistic ways.
  2. Motivation: Emotions are often the driving force behind a hero’s actions. Understanding what your hero feels helps to explain why they make certain choices, adding layers to their character and making their journey more believable.
  3. Conflict and Growth: Emotional struggles and triumphs create compelling conflict and drive character development. Witnessing a hero navigate their emotional landscape allows readers to experience growth and transformation alongside them.

Techniques for Exploring Your Hero’s Emotions

To effectively tap into your hero’s emotions, you need to employ a variety of techniques that reveal their inner world to the reader. Here are some strategies to consider:

  1. Show, Don’t Tell: Instead of directly stating how your hero feels, show their emotions through actions, dialogue, and internal monologue. For instance, instead of writing “John was angry,” describe how he clenched his fists, his face turned red, and he spoke through gritted teeth.
  2. Internal Monologue: Use your hero’s thoughts to delve deeper into their emotions. Internal monologue allows readers to hear the character’s inner voice, providing insight into their fears, hopes, and desires. This technique is particularly effective for conveying complex or conflicting emotions.
  3. Dialogue: Emotions can be powerfully conveyed through dialogue. The way your hero speaks—tone, word choice, pacing—can reveal their emotional state. Pay attention to subtext as well; what is not said can be as revealing as what is said.
  4. Body Language and Facial Expressions: Nonverbal cues are a vital part of emotional expression. Describe your hero’s body language and facial expressions to convey their feelings. Slumped shoulders can indicate defeat, while a bright smile can suggest joy or relief.
  5. Sensory Details: Emotions often heighten the senses. Use sensory details to immerse readers in your hero’s emotional experience. Describe how the world feels, smells, sounds, and looks from their perspective when they are happy, scared, or grieving.

Building Emotional Arcs

An emotional arc is the journey your hero undergoes in terms of their emotional state from the beginning to the end of the story. Crafting a strong emotional arc is essential for character development and overall narrative impact.

  1. Starting Point: Establish your hero’s emotional baseline at the start of the story. This provides a reference point for measuring their growth and changes.
  2. Challenges and Triggers: Introduce events and situations that challenge your hero’s emotional state. These triggers should be significant enough to cause an emotional response and propel character growth.
  3. Climax: The emotional climax is often tied to the story’s overall climax. This is the point where your hero faces their greatest challenge and their emotions reach a peak. It’s a moment of intense vulnerability and revelation.
  4. Resolution: Conclude the emotional arc by showing how your hero has changed emotionally. This can be a return to a new normal, a moment of acceptance, or a newfound strength.

Playing on Your Hero’s Trauma Using CBT Principles

Cognitive Behavioral Therapy (CBT) offers valuable insights into how trauma shapes a person’s emotions and behaviors. By applying CBT principles to your hero’s emotional journey, you can create a more authentic and nuanced portrayal of their trauma and growth.

  1. Identifying Core Beliefs: Trauma often leads to the formation of negative core beliefs. These beliefs shape how your hero sees themselves and the world. For instance, a hero who survived a traumatic event might believe they are powerless or that the world is inherently dangerous. Understanding these beliefs helps to explain their actions and reactions throughout the story.
  2. Triggering Emotional Responses: Use specific events or interactions to trigger your hero’s trauma-related emotional responses. These triggers can be people, places, or situations that remind them of their trauma, leading to intense emotional reactions. This technique adds depth to their emotional arc and provides opportunities for growth.
  3. Cognitive Distortions: Highlight your hero’s cognitive distortions, such as black-and-white thinking, catastrophizing, or overgeneralization. These distorted thoughts can create internal conflict and drive the plot. For example, a hero who catastrophizes might interpret a minor setback as a complete failure, leading to a crisis of confidence.
  4. Emotional Regulation: Show your hero learning to manage their emotions through healthy coping mechanisms. This can include self-reflection, mindfulness, or seeking support from other characters. Their journey towards emotional regulation can be a significant part of their character development.
  5. Reframing and Growth: As your hero confronts their trauma, use CBT techniques like reframing to show their growth. Reframing involves changing negative thought patterns into more positive or realistic ones. For instance, a hero who initially believes they are powerless might, through their experiences, come to see themselves as resilient and capable.

Tapping into your hero’s emotions is essential for creating rich, engaging narratives. By understanding their emotional depth, employing techniques to reveal their inner world, and crafting a compelling emotional arc, you can create heroes that resonate deeply with readers. Incorporating CBT principles into your hero’s emotional journey adds authenticity and depth, making their experiences and growth more believable. 

If you’re eager to explore more tapping into your Hero’s emotions and using psychological principles to do it, I highly recommend checking out my book, The Psychology of Character Building for Authors. This comprehensive guide delves into the psychological underpinnings of character development, providing invaluable insights and practical techniques to help you create multifaceted characters that resonate with readers. 

Happy writing!

Posted on

From the Professor’s Desk: Sentence Diagramming 101

Do you ever wonder about what’s under the hood of the English language? English is a rich language with a convoluted history and tons of inconsistencies, but contrary to appearance, it does actually have rules that organize the way we put our words together. One way to visually explore the way English functions is to use a technique called sentence diagramming. 

Some of you may remember traditional sentence diagramming from some long ago class in elementary school or think of it as something you did for a day in grammar school during the 80s. Yes, sentence diagramming has been around for a while (since the 1900s!), but it’s still relevant if you want to think structurally about the way English works. 

Sentence Diagramming 101: Fun with Linguistics (and Movies!) is a great resource for anyone interested in understanding the underlying structure of the English language.

“A surprisingly fun jaunt into the convoluted wilds of the English language!”

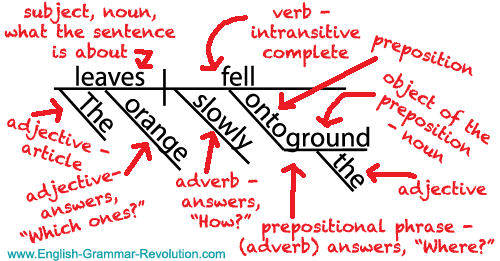
Sentence Diagramming 101: Fun with Linguistics (and Movies) explores the relationship between words using traditional sentence diagramming and amusing movie references. Inside this textbook, you’ll find detailed explanations as well as 50+ film-focused practice exercises, and on the companion website, you can explore the answer key, informative videos, additional practice, and lively discussions about the English language.

One abiding question often accompanies any discussion of traditional sentence diagramming (Reed & Kellogg): does sentence diagramming create better writers? This book’s answer: Maybe. If you think of the English language as a car, think of this book as a look under the proverbial hood of the language. Someone may know the names of all the parts and how they work together to make the vehicle move when the gas pedal is held down-but does that knowledge create a better driver? Perhaps. Perhaps not. Perhaps that driver will explain spark plugs while they drive straight off a cliff.

Such is also true of writing. English can be messy, filled with archaic bolts and cobbled coils, but somehow, it still manages to get users where they want to go. Hop in and enjoy the ride!

A great primer for writers, word enthusiasts, and those seeking to understand the fundamentals of English grammar, this textbook breaks down complicated ideas into digestible pieces.

Topics include:

  • The Basics: Parts of Speech and Word Function
  • Sentence Patterns
  • Phrases, Verbals, and Clauses
  • Sentence Types
  • Weirdness: Questions, Commands, Expletives, Poetry, Made Up and Repeated Words

Additional features:

  • ADA Compliant
  • Free Companion Website with Video Overviews, Answer Keys, Practice Explanations, Additional Practice, and Language-Focused Discussions

Get under the hood of the English language with Sentence Diagramming 101!

Posted on

Crafting Authentic Villains: The Heart of Compelling Conflict

Creating authentic villains is an art that breathes life into narratives, infuses tension, and drives stories forward. Villains, often the shadowy figures lurking in the periphery, can be as complex and multifaceted as protagonists. They should not merely serve as obstacles but as catalysts for growth and change, both for the story and its characters. Here, we delve into the intricacies of crafting authentic villains that captivate readers and elevate your storytelling.

Understanding the Villain’s Role

At the core of any memorable villain is their role in the narrative. A well-crafted villain is not just an antagonist but a character whose actions and motivations are integral to the story’s progression. They must challenge the protagonist in ways that force them to evolve. To achieve this, consider the following:

  1. Purpose and Motivation: Every villain needs a clear, compelling reason for their actions. This motivation should be rooted in their backstory, beliefs, and desires. Whether it’s revenge, ambition, or a misguided sense of justice, understanding why your villain does what they do makes them more relatable and less of a caricature.
  2. Conflict and Stakes: A villain’s actions should raise the stakes and create significant conflict. Their presence should disrupt the status quo and compel the protagonist to confront their deepest fears and flaws. This conflict drives the narrative and keeps readers invested.

Developing the Villain’s Backstory

An authentic villain is often a product of their past. A detailed backstory provides insight into their psyche and helps explain their motivations and actions. Consider these elements when crafting your villain’s history:

  1. Origins and Upbringing: Reflect on the villain’s early life. What events or experiences shaped their worldview? Traumatic events, familial influences, or societal pressures can all contribute to their current behavior.
  2. Turning Point: Identify a pivotal moment that set the villain on their path. This could be a betrayal, loss, or revelation that fundamentally altered their outlook on life and spurred them towards villainy.
  3. Complex Relationships: Explore the relationships that matter to your villain. Allies, mentors, and rivals can all play crucial roles in their development. These relationships add depth and can create intriguing subplots and dynamics.

Humanizing the Villain

To make a villain truly compelling, they need to be humanized. Readers should be able to see aspects of themselves or people they know in the villain. This does not mean justifying their actions, but providing a window into their humanity:

  1. Flaws and Vulnerabilities: No one is entirely evil or good. Give your villain weaknesses, fears, and insecurities. These elements make them more relatable and believable. A villain who struggles with self-doubt or who has moments of kindness can be particularly compelling.
  2. Sympathetic Traits: Introduce traits that evoke empathy. Perhaps the villain has a code of honor, shows kindness to certain individuals, or has a dream that, while misguided, is understandable. These traits can create a complex emotional response in readers.
  3. Internal Conflict: Show the villain grappling with their choices. Internal conflict adds layers to their character and can lead to unexpected moments of vulnerability or hesitation. This can make the villain more unpredictable and engaging.

Crafting Memorable Encounters

The interactions between your villain and other characters, especially the protagonist, are pivotal. These encounters should be charged with tension and reveal different facets of the villain’s personality:

  1. Dialogue: Use dialogue to reveal the villain’s intellect, wit, and philosophy. Sharp, memorable exchanges can make confrontations more impactful and highlight the ideological differences between the villain and protagonist.
  2. Actions and Decisions: The villain’s actions should consistently reflect their core motivations and personality. These actions should be significant and impactful, driving the plot forward and forcing the protagonist into difficult decisions.
  3. Symbolism and Imagery: Utilize symbolism and imagery to reinforce the villain’s presence and influence. Recurring motifs, colors, or settings associated with the villain can create a lasting impression and add to their mystique.

Avoiding Common Pitfalls

Creating an authentic villain involves avoiding clichés and ensuring your villain is as well-rounded as any other character. Here are some common pitfalls to avoid:

  1. One-Dimensional Evil: Avoid making your villain evil for the sake of being evil. Depth and complexity are crucial. Provide clear reasons for their actions and show their humanity.
  2. Over-the-Top Monologues: While dialogue is important, avoid clichéd villain monologues. Instead, focus on meaningful exchanges that reveal character and advance the plot.
  3. Lack of Agency: Ensure your villain is proactive rather than reactive. They should have clear goals and take decisive actions to achieve them. A passive villain is less compelling and poses less of a threat.

Dive Deeper into Character Building

Crafting an authentic villain is a delicate balance of complexity, relatability, and menace. By understanding their role, developing a rich backstory, humanizing their character, creating memorable encounters, and avoiding common pitfalls, you can create villains that not only enhance your narrative but also leave a lasting impact on your readers. An authentic villain is more than just an obstacle; they are a force that shapes the story and challenges the protagonist to their core. 

If you’re eager to explore more about crafting authentic villains and other complex characters, I highly recommend checking out my book, The Psychology of Character Building for Authors. This comprehensive guide delves into the psychological underpinnings of character development, providing invaluable insights and practical techniques to help you create multifaceted characters that resonate with readers. Whether you’re a seasoned writer or just starting out, this resource will enhance your ability to craft memorable and authentic characters.

Happy writing!

Posted on

From the Editor’s Desk: Tips to Save Your Sanity During Editing

It’s time. You know it. Pour yourself a drink (whatever liquid gets you through the writing process), put on some comfortable clothes, and settle down in front of the computer. Editing is never easy, but there are some general things you can do that will make it easier the next time you finish a book. Here are some general tips to get you through this round of editing:

1. Read. Read in your genre. Read outside of your comfort zone. Read established writers with distinctive voices. Read emerging writers with astounding vision. 

2. Learn the rules. You can’t effectively break the rules of grammar without knowing them (otherwise your clever fragment may just look like a mistake!). Take it slow, but take the idea of learning to wield your tools, your words, seriously. Tons of books, blogs, and videos cover the rules. Check them out! I’m a fan of the classic Eats, Shoots, & Leaves: The Zero Tolerance Approach to Punctuation by Lynn Trusse. I also recommend Woe is I: The Grammarphobe’s Guide to Better English in Plain English by Patricia T. O’Conner.

3. Read your work out loud … backward. Yes, I said backward. Start with the final sentence, find the capital letter that starts it, and read that sucker aloud all the way to the end punctuation (period, question mark, exclamation mark). Is it a complete thought? Does it make sense? Cool. Go back or up a line. Find the previous sentence and repeat the process. Reading your sentences in isolation forces you to look at them one-by-one (instead of the way you read the story). You likely won’t do this for the entire thing, but you can put a serious dent in troublesome areas this way.

3a. Live with someone? Or have a very expressive pet? Read your story out loud and watch their reaction. If their expression is confused, mark that spot to revise later. If you stumble, mark that part to revise later. You’re not narrating here (though I suppose you could if you’re supper confident in your splicing skills); you’re reading for flow and comprehension. 

4. Take breaks. Editing is not a one-and-done event. It can be a marathon of late nights/early mornings and five-minute breaks from work (and lots of tea if you’re me!). It’s best accomplished in small chunks with a specific focus. If you read your work straight through looking for all of the things, you will find some of the problem stuff—but definitely not everything (not without making yourself crazy first!). 

5. At some point, your manuscript is finished. Let it go. Yes, you could make it better tomorrow—but how many tomorrows are spent re-working something when you could be on to your next story? Academics say papers are never done—just due. Give yourself a deadline and stick to it. Find your “good enough” point and watch Frozen (Let it go!!!). We will never get to see it if you keep tinkering with chapter five. 

6. Remember that your story is worth telling. No one can tell it like you can. No one else can do what you can. Don’t give up. We need to read your words. Get it out in the world!

Oh, you wanted ACTUAL steps on how to do this? Well, conveniently enough, I already wrote that book, and it’s a bit longer than  a blog post. If you want specific step-by-step instructions on how to edit your book, check out 10 Steps to Save Your Editor’s Sanity, a helpful guide that walks you through the process of self-editing one task at a time!

Posted on

From the Author’s Desk: Worldbuilding 101

Part Two: How can I create a cohesive world for my readers?

Okay, now you have an idea for the world of your story. It’s time to get into it. 

Here’s a quick list to keep in mind when building your world:

  1. Organization is key. Decide right now how you will be keeping track of these details. Use whatever makes sense to you. Some people use handwritten notebooks. Some use a detailed Word oc. Some use writing programs designed to organize your details. Find a system that you like and commit to it (at least for this world–you can change it up for the next world if you want). 
  1. There is not a predetermined order to building your world (unless you want it that way!). You can move from building the map to deciding the fashion to creating the calendar, then focus on how medicine works and hop back to wars in your world. Record the details as they come to you. There is no pre-recorded method that you must follow.
  1. Worldbuilding may seem like homework for you as a writer, but you are not obligated to answer every single detail. Think of it as documenting the way you weave the story you are creating. Focus on the areas that make sense for your story and your world. If you know the next scene is in a bar, take some time to think about that place: Who owns this bar? How did they get it? How successful is it?  How is it laid out? Who else is in there (workers/patrons)?  What’s the entertainment? What’s the top things people order? What’s the vibe? And finally, how does any of that relate to your story? This should be a fun part of the creative process. Feel free to skip around.
  1. I know you’re excited that you know every single ruler for the last five hundred years of a dynasty, but do your readers need to know all of that right now? Probably not. Recall the iceberg effect: you are aware of everything under the water, but the story you are telling might just be the tip. When you add these details to your story, be sure to slide them in as a natural addition to the scene rather than as an info-dump. A good rule of thumb is to hint at it, be confident that you know the names (maybe have a mnemonic song to get the order right like the British have for their monarchs over the years) but let that background info seep into the story in the right place and the right time.
  1. Writing is work and can be hard at times, but it should also be fun. If you’d rather be writing the story itself, then do that instead! Just remember that worldbuilding is here when you’re ready to build more of the scaffolding that will hold your story up. Keep your guide next to you and pop information into it as your story is flowing.
  1. Again have fun! You aren’t graded on this; well, except the fan who will excitedly email you about that tiny detail that shifted from book one to book seven…YOU’VE GOT THIS!

Shameless Self Promotion: The General Worldbuilding Guide

Posted on

How Trees, Including Those in Cities, Nurture Our World

If you follow me at all, then you know I have a healthy obsession with trees. So during a walk in a local park recently, I was delighted to see signs mounted on trees detailing the annual monetary value of the benefits each tree brings to our community. It underscores the often-overlooked economic contribution that each tree makes, namely:

🌳 Improved air quality

🌲 Energy savings

🌴 Filtered pollutants

🎋 Improved mental health

🌳 Increased property value

Trees are vital to our existence and well-being, from the towering oaks in the countryside to the leafy sentinels in our city parks. Recognizing trees in economic terms fosters greater environmental stewardship and reinforces the argument for urban green spaces. Let’s delve into the surprising ways trees, especially those in urban environments, contribute to the health of everything around them—ourselves included.

Trees act as the lungs of the city. They tirelessly work to filter pollutants from the air, including harmful gases like carbon monoxide, sulfur dioxide, and nitrogen oxides. By capturing these pollutants, trees provide us with cleaner air to breathe, which is essential in urban settings where air quality can often be poor.

But the benefits of urban trees go beyond air purification. They are also crucial in managing stormwater. Like sponges, trees absorb rainfall, reducing runoff and decreasing the burden on our city’s drainage systems. This natural process helps mitigate flooding and protects the quality of our waterways.

Have you ever noticed how much cooler it feels to walk in the shade of trees during a hot summer day? Trees naturally cool the environment through a process known as transpiration, where water evaporates from the leaves. This has a significant impact on urban areas, where concrete and asphalt soak up the sun’s heat, leading to the notorious ‘heat island’ effect. Strategic planting of trees can reduce urban temperatures considerably, creating a more pleasant and energy-efficient environment.

Aside from their environmental significance, trees hold a special place in promoting human health. Studies have shown that simply being around trees reduces stress, enhances mood, and can improve overall emotional well-being. The secret lies, in part, with substances called phytoncides—natural oils within trees. Breathing in these compounds can boost our immune system, showing yet another profound interaction between trees and our health.

And let’s not forget that trees are vital wildlife habitats, offering food, shelter, and nesting sites, while also serving as corridors for safe passage and biodiversity conservation. 🦅

Make sure you use coupon code 4HP10 for 10% OFF your entire order. 

Posted on

Anatomy of a Book’s Page: the Guts!

Writer’s Bane: Formatting 101 starts with helping authors and designers to identify every part of a book and which ones matter the most for the genre and type of book they aim to create. It’s vital that everyone knows the proper terms and verbiage when trying to communicate with your formatter in hopes that they make the changes you want precisely and with little confusion. I can’t express how often clients are using the wrong terms and I’ve changed the item they said, not the one they envisioned. Let’s break down my top three!

Chapter Header versus Headline

This may feel like a small matter, but for a typesetter it means a lot behind the scenes for both how we design a chapter page as well as how we program an ebook and even the Table of Contents. Chapter Header is often just a number, “chapter #”, “week #”, or some other short and simple implication of a new chapter and its identification. Under the hood, these are the h1 programming tier.

As far as adding a chapter headline, or subtitle, that’s referred to as a headline. It’s often presented in a different font or more elegant font to make an effort to emphasize the theme or topic for the chapter more pronounced. You don’t need a headline or to title your chapters. Chapter headlines are more often seen in nonfiction and certain genres. Under the hood, these are the h2 programming tier.

Margins versus Line Spacing versus Paragraph Spacing

There are no words for the amount of miscommunication I have seen in my career and peers when it comes to corrections or changes involving adjusting the spacing. It’s important that when communicating with a formatter to be clear which of these three you are implying and be aware of the limitations or design faux pas we help you avoid.

Margins refer to the space between the page’s trim edge or actual finished edge and where the textual content lands. If you are creating a book that is Print-on-Demand or traditional print fiction style, this should be 0.5 inch margin. Many designers also will have a larger inner, or inside the spine, margin of 0.65-0.8 inches depending on the total page count and binding type of your book. Traditionally, the margin for a body page on the top and bottom are set for 0.75 inches to allow enough space before the 0.5 inch minimum for page numbers, header, and footer. In short, there may be very little a designer can change in regards to these design aspects if you wish for textual content to be closer to the page’s edge.

Line Spacing refers to the spacing between the lines of text adjacent to each other from the top and/or bottom of it. This is often called leading as well, and it’s common to have a leading of 11-14 points when designing a book. Never should your book be double spaced. This is reserved solely for the purpose of editors and giving them space to leave editorial marks and notes accordingly. Double space is often used for academic papers for this reason as well. As for published and professional books, they should never be double spaced unless you are creating an editing exercise.

Paragraph spacing refers to the space above, between, and below a specific paragraph. It’s more common to have no paragraph spacing in body text with a first line indent of 0.25-0.5 inches. If you want no first line indent, it is recommended to add at least a 0.0625 inch space after the paragraph style. This may make content harder to identify though. Paragraph spacing is a vital part of a reader seeing when time or scenes change, special content broken out, or simply in a textbook which chunk belongs to which area. These should be used purposefully and placed accordingly. I highly recommend trusting your editor or designer. OR check out the Chicago Manual Style for aid.

Quote versus Pull Quotes

A quote or citation should always have paragraph spacing above and below it as well as left and right indentation to help it stand out. Some go as far as italicizing these, though that should be dependent on the intent of the author and/or editor. These are always within the flow of the content and don’t disrupt the overall flow of text.

A pull quote takes something from the content nearby and creates a graphical image of text. These quotes are often seen in magazines, textbooks, and nonfiction more than anywhere else. They create excitement or point out a vital statement that shouldn’t be glossed over. They act the same as placing an image or object and the text should flow around these pull quotes. Again, these are taken from something in the content and therefore is often a repeat of what is found on the page or spread.

Discover More

Like the advice and information you see here? Check out the Formatting 101 textbook here! This tome holds a variety of answers for those seeking to become typesetters, looking to self-publish their book, or simply want to learn how to communicate and prepare their manuscripts to get the most out of their designers. The Writer’s Bane is a curse and passion, both a want and need to tell a story. In this volume, you will learn the importance for prepping a book for layout as well as laying it out in a way that appeals to your readers of any genre including picture books, chapter books, fiction, memoirs, textbooks, workbooks, and everything in-between.

Posted on

Sustainable Practices at Work: Turning Good Intentions into Great Impacts

I’m all about sustainability in the workplace. It’s one thing to talk the talk, but walking the walk? That’s where the real change happens. Below I’ll share some practical insights on reducing waste in your workplace.

First things first, make sure you are recycling everything you can, and recycling correctly. Check with your solid waste providers to make sure you are taking full advantage of what they recycle, and that you’re not trying to recycling more than you’re actually allowed (known as wishcycling). 

Once you’ve done that, it’s time to get creative. Find ways to reduce waste in the first place – can you get rid of paper by digitizing your operations? This way you save money by reducing the paper you purchase, and reduce the waste created by printed paper. This is a no-brainer for the trees and our environmental footprint. Do you have disposable dishes in your breakroom? Consider converting these to reusable dishes. It might seem small, but over time, the amount of waste you can eliminate is nothing short of impressive.

Consider introducing an employee courtesy recycle program that goes beyond just soda cans and paper. Broken gadgets, spent printer cartridges, tired batteries, lonely plastic bags, and even office supplies—all can get a second lease on life. Look for programs in your area where you can recycling these items on your employees’ (or coworkers’) behalf.

If your region does not have curbside composting collection, look into creating a grassroots composting initiative, where you can turn food scraps into garden gold. If your office produces coffee grounds, or fruit and veggie scraps, these can be composted – see if any employees would like to take these for their home composter.

is power, so consider offering sustainability training sessions, watch parties, and lunch & learns. Ever shared popcorn over a documentary on climate change? It’s a game-changer. You could write an internal blog with eco-tips and information.

If you’re thinking this is all super complicated, let me share a secret: creativity is your golden ticket in sustainability. Dive into your local scene. When we did some digging, we discovered a company revamping plastic bags into outdoor furniture, and a clothing manufacturer hungry for our old reusable bags. Don’t forget electronic waste; local recyclers will take this off your hands – everything from clunky monitors to batteries.

Remember, your colleagues may have some sustainability hacks as well. Someone out there knows where to take those glass jars piling up or might be just waiting for you to start a compost bin. These aren’t your run-of-the-mill services you’ll find at the drop of a hat—but with some searching and diligence, you will find the resources you need.

So, take this as your invite to get your hands dirty (figuratively, of course) and make your workplace a beacon of sustainability. It’s a collective journey—let’s transform our workspaces, inspiring one recycled notepad, one compost heap, and one eco-friendly swap at a time.

Make sure you use coupon code 4HP10 for 10% OFF your entire order. 

Posted on

Anatomy of a Book – What Goes Inside?

If you haven’t discovered Writer’s Bane: Formatting 101, you’ve been missing out on a lot of answers to questions. This includes what goes inside your book, how to prepare a manuscript for a typeset, and how to design the interior of your book. Let me share a sampling of one common question I get in workshops and email: 

What else do I put inside my book?

Front Matter

Before a reader gets to the first chapter there are several key pages that need to be there first. This also can impact how professional looking your book is seen to book store chains and should be overlooked. For example, everyone should be doing a half title and full title page, followed by a proper copyright page. These three pages can add a space to sign and a feeling of legitimacy to your book. Inside Formatting 101 I dive into great detail and give several examples of what these pages look like, their purpose, and an author’s reason for using one or how to use them to your advantage. In short, here’s a list of pages (in a recommended hierarchy) that can be added as roman numeral pages before chapter 1, page 1 unfolds:

  1. Half Title page – this general just has the title, subtitle, and often matches the title font from the front cover.
  2. Full Title page – this should have title, subtitle, series, author, and publisher logo.
  3. Copyright page – Title, Author, Copyright date, publisher information, design and editorial credits, legal jargon, Library of Congress Control Number (LCCN), and International Standard Book Number (ISBN) for all formats. Take a look at many books for examples.
  4. Dedication – Short and sweet. Often centered on a page or in children’s books seen above copyrights on the same page!
  5. Endorsement – Sometimes I see this before the half title page or even before the dedication. I recommend it here since it comes off cleaner and less jarring for readers.
  6. Table of Contents – You want to place this here as a dividing line between actual reader content and the formalities and legal aspects of what is listed above it.
  7. Foreword – Any words that need to come before read this book. Whether you are preparing the reader or having someone comment on the book. It’s often encouraged to email and ask for a foreword about the author or book from other authors or professionals that write or enjoy what your book is about. Even celebrities do this!
  8. Words from the Author – A more author centric foreword.
  9. About the Author – This is here for nonfiction books. Often readers want to know who the expert on the topic is before reading further on a topic. 
  10. Acknowledgements – These can go here or in the back matter.
  11. Preface – More common in nonfiction. This is often a statement of some kind on the topic to encourage readers or share something about the book. Often this can reference the fact of acknowledging a school of thought or piece of history that was not included and the reasoning behind it or where to discover more on the topics within.
  12. Prologue – More common in fiction. This is an event that the readers should experience that influences the story or shares vital information. Whether its past events that created magic to a girl witnessing something through a keyhole that will impact the plot. It should have a direct connection to the character or plot in some way.
  13. Introduction or Overview – Seen in nonfiction, this is gearing up what the book is about or what they should be learning as they travel through the content. Sometimes this may even have instructions of some kind on how to use the book.

Content

This should always start as chapter 1 or section 1 on a right page with PAGE 1. It seems strange, but many programs including InDesign force typesetters to follow this rule. In short, this is not up for discussion as far as the publishing and design industries are concerned. Be mindful of what pages fall between your front matter and back matter. This includes:

  1. Section page – Traditionally on the right or odd page. 
  2. Chapter page – First one starts traditionally on the right or odd page. All consecutive chapter pages can fall on either side or only on the right page depending on the amount of content or designers preference. More and more books will land these on right and left pages to save on page count and lower print costs.
  3. Body page – These are the pages that hold the rest of the story. They often have the page numbers on the bottom center or outer margins, content justified and uniform across the page, and headers and/or footers. These often will have the title, subtitle, author, chapter, or subchapter information depending on type of book and designer’s preference.

Back Matter

This is very much like the front matter, but items you would prefer them to read and explore after your story. If you are working on nonfiction, this is often where to find more resources, referenced materials, and even tools for applying what the reader has learned or even fill in gaps that may be needed. For example, in Formatting 101 I’ve added a large glossary in hopes of catching any moment where a term is used that may be industry or design specific to make the content more widely understood to even those exploring book formatting and publishing for the first time.

  1. Epilogue – This is seen in fiction work where we get to see what transpired after the events. It can often feature showing the characters happy ending in greater detail, the rise of something more happening in the series, or even showing events from another POV for this one chapter only to reveal something more about the story. Again, it should impact the reader via their connection to the character or plot.
  2. About the Author – Unlike nonfiction, it is more traditional to see this placed here in fiction work. Be sure to include your social media!
  3. Acknowledgements – If you have one that is more than 1-2 pages long, you may want to place this here in the back of the book.
  4. Book Listing – Recommending other books you or similar authors in your network can be helpful.
  5. Preview or Sneak Peek – It’s not uncommon in romance novels to see the first chapter or snapshot of what the next book will be about. This can be handy for any genre to showcase that this is part of a series.
  6. Bibliography or References – Often seen in nonfiction as a means to cite sources.
  7. Endnotes – Many folks still use endnotes, but I do encourage you to consider footnotes since this works favorably for eBook readers as well as the only kind accepted by KDP/Amazon and other vendors.
  8. Index – Again, indexes are being replaced with the ability to have searchable ebooks and PDFs or digital copies of books. They are still very much curated content and take lots of time to prepare, but a personal preference in today’s world.
  9. Appendix – Content or worksheets. Materials you either referenced or provided, including excerpts of public domain material, is often seen in nonfiction. Fiction usually saves this for fun extras, coloring pages, and even the occasional recipe.
  10. Book Club Questions – Librarians love them and book clubs live for them. Don’t underestimate the power of providing these. There shouldn’t be a clear answer. I always tell fellow author’s pretend this is a chance to start your very own fight club!

Discover More

Like the advice and information you see here? Check out the Formatting 101 textbook here. This tome holds a variety of answers for those seeking to become typesetters, looking to self-publish their book, or simply want to learn how to communicate and prepare their manuscripts to get the most out of their designers. The Writer’s Bane is a curse and passion, both a want and need to tell a story. In this volume, you will learn the importance for prepping a book for layout as well as laying it out in a way that appeals to your readers of any genre including picture books, chapter books, fiction, memoirs, textbooks, workbooks, and everything in-between.

Posted on

From the Author’s Desk: Worldbuilding 101

Part One: What is worldbuilding?

Okay, let’s get into it with some generalizations. 

Worldbuilding is what creative writers do when they form the framework that contains their story. It includes everything from the layout of the furniture in someone’s bedroom and the geography of the city they live in, to the languages spoken by their fellow inhabitants and the technological capabilities of the society that surrounds them. It’s the details that bring a story to life–the thing that separates a decent tale from a life-changing epic adventure that every single one of the reader’s friends must read immediately. It gives a story depth and richness and the sense that there is more beyond the page, that readers could find a pulsing, vibrant existence beyond the edges of the pages they are reading. 

J.R.R. Tolkien explains the “magic” of reading in his essay “On Fairy Stories” when he likens what happens to readers who imagine a story to an act of enchantment. The author has written the words, but the readers are ones who transform those markings on a page into scenes in their imaginations. He calls this enchantment an act of subcreation; that is, the readers are “creating” the story for themselves based on the words of the author. This can only happen, he insists, when the world of the story they are reading is believable; in fact, the Secondary World (the world inside the story) must be as believable as the Primary World in which the readers live. A common way to describe what happens when readers engage in this act is the “willing suspension of disbelief.” The idea is that reader willingly suspend their natural disbelief when they enter a story–they know billionaires don’t act like that, or that swords aren’t sentient, or that cars can’t fly, or that word can’t alter the physical world–but for the sake of the story, they “suspend” that “disbelief” long enough to enjoy the story in that world. Tolkien doesn’t like this approach, insisting that if the world is done properly, if the nearly elvish craft of enchantment has been done well, the readers won’t have to suspend their disbelief–they will believe. Fr the time they spend immersed in the pages of that story, they will fall into that world naturally and completely. 

How does one accomplish that? According to Tolkien, by having a completely built world in the background of your story. You should know every detail, every crevice, every whisper. That said, Tolkien had reams of journals and maps and lineages and histories for Middle Earth. Do you have to do all that? Of course not. But it should look like you have. After all, unless they read your worldbuilding guide, readers don’t see your entire world anyway–they just see the parts that connect to the story you are telling–but they should believe that the rest of the world is there, the ice beneath the tip of the iceberg hidden beneath the water. If you are confident and consistent in your details, that iceberg will feel massive to readers.  

So, how can you provide this magical transformative experience for your readers? Do your homework. Build your world before you step into it (or before you finish stepping out of it on that last page!) so readers feel the world lives beyond the moments they see in the story.

Looking for some help along the way? Check out The General Guide to Worldbuilding and get serious about your world!